Table Of Contents
Graphics(翻訳中)
このパッケージは描画に使用される多くの低レベル関数をアセンブルします。グラフィックスパッケージ全体はOpenGL ES 2.0と互換性があり、多くのレンダリング最適化機能を備えています。
The basics(基本)
画面に描画するには、次のものが必要です:
Canvasオブジェクト
Instructionオブジェクト
Kivyの各 Widget にはデフォルトで Canvas が既に用意されています。widget を作成すると描画に必要なすべての命令を作成できます。 selfが現在のwidgetである場合、以下を行えます:
from kivy.graphics import *
with self.canvas:
    # Add a red color
    Color(1., 0, 0)

    # Add a rectangle
    Rectangle(pos=(10, 10), size=(500, 500))
Color と Rectangle 命令は自動的にcanvas オブジェクトに追加されてウィンドウが描画されるときに使用されます。
注釈
Kivyの描画命令はwidgetの位置やサイズに自動的には関係しません。そのため描画する際にはwidgetの位置やサイズの要素を考慮する必要があります。widgetに対する描画命令を作成するには、KvLang で命令を宣言するか、posとsizeの変更にバインドする必要があります。詳細については Adding a Background to a Layout(背景のレイアウトを追加する) を参照してください。
GL Reloading mechanism(GLのリロードのメカニズム)
バージョン 1.2.0 で追加.
アプリケーションの起動中、OpenGLコンテキストが失われる可能性があります。発生の際:
OS XまたはWindowsプラットフォームでウィンドウのサイズが変更されて、かつpygameをウィwindow providerとして使用している場合。これはSDL 1.2によるものです。 SDL 1.2のデザインではウィンドウサイズを変更するたびにGLコンテキストを再作成する必要があります。これはSDL 1.3で修正されましたが、pygameではデフォルトでまだ使用できません。
Androidがアプリケーションリソースを解放したとき:アプリケーションがバックグラウンドになるとAndroidがOpenGLコンテキストを再利用してリソースを別のアプリケーションに提供する可能性があります。ユーザーがアプリケーションに戻ると新しく作成されたglコンテキストがアプリケーションに渡されます。
1.2.0からGPUを使用してすべてのグラフィックスリソースを再ロードするためのメカニズム(Canvas、FBO、Shader、Texture、VBO、およびVertexBatch)を導入しました:
VBOとVertexBatchはグラフィックスの指示で作成されます。再読み込み時に再構築するために必要なすべてのデータがあります。
Shader:VBOと同じように、シShaderで使用されるソースと値を保存し、頂点/フラグメント/プログラムを再作成できます。
Texture: テクスチャにソース(画像ファイルまたはatlas)がある場合はイメージはソースからリロードされ、GPUに再アップロードされます。
これらの場合は自分でカバーする必要があります。
ソースのないTexture :手動でTexture を作成し、データ/バッファを手動でビルドする場合は、自分でリロードを処理する必要があります。そういったケースを管理する方法については、Texture をチェックしてください。 (テキストレンダリングはすでにテクスチャを生成し、再ロードを処理します。テキストを自分でリロードする必要はありません)。
FBO:FBOに何度も追加/削除/描画の動作を何度もした場合は読み込めません。私たちは動作の履歴を保存していません。ソースのないテクスチャについては、Framebuffer をチェックして、そのケースを管理する方法を学んでください。
-
class
kivy.graphics.Bezier¶ ベースクラス:
kivy.graphics.instructions.VertexInstruction2次元のベイジアン曲線です。
バージョン 1.0.8 で追加.
Parameters: - points: list
フォーマットは座標のリスト(x1、y1、x2、y2 ...)
- segments: int, デフォルト値は180
曲線を描くために必要なセグメントの数を定義します。セグメントが多くある場合は図はスムーズになります。
- loop: bool, デフォルト値は False
ベジェ曲線を設定して、最後の点を最初の点に結合します。
- dash_length: int
セグメントの長さ(破線の場合)は、デフォルト値は1です。
- dash_offset: int
セグメントの終わりから次のセグメントの始まりまでの距離です。デフォルト値は0です。変更すると破線になります。
-
dash_length¶ カーブ内のダッシュの長さを取得/設定するためのプロパティです。
-
dash_offset¶ カーブ内のダッシュ間のオフセットを取得/設定するためのプロパティです。
-
points¶ 三角形の点を取得/設定するためのプロパティです。
警告
これにより常に新しい座標リストからグラフィック全体が再構成されます。そのためCPUをとても大量に消費することがあります。
-
segments¶ カーブ内のセグメントを取得/設定するためのプロパティです。
-
class
kivy.graphics.BindTexture¶ ベースクラス:
kivy.graphics.instructions.ContextInstructionBindTexture Graphic。 BindTextureはテクスチャをバインドして後で描画するためにGL_TEXTURE_2Dを有効にします。
Parameters: - texture: Texture
指定されたインデックスにバインドするテクスチャを指定します。
-
source¶ テクスチャの読み込み元(ファイル名)を設定/取得します。
-
class
kivy.graphics.BorderImage¶ ベースクラス:
kivy.graphics.vertex_instructions.Rectangle2D境界画像です。境界線イメージの動作はCSS3のborder-imageの概念に似ています。
Parameters: - border: list
形式の枠線情報(下、右、上、左)。各値はピクセル単位です。
- auto_scale: string
バージョン 1.9.1 で追加.
バージョン 1.9.2 で変更: auto_scaleは以前はBool型で、string型に変更されていました。
Can be one of ‘off’, ‘both’, ‘x_only’, ‘y_only’, ‘y_full_x_lower’, ‘x_full_y_lower’, ‘both_lower’.
auto_scale は9スライスの動作を制御します。
デフォルトでは境界の値は正確に保存されます。つまりオブジェクトの合計サイズが境界の値よりも小さい場合は、テクスチャが内側に表示される「rendering errors」が発生します。また、これにより元のテクスチャのサイズよりも大きくなる丸いボタンを実現できなくなります。 auto_scaleのさまざまなオプションは2種類のレンダリングのいくつかの組み合わせを実現します。
‘off’ : デフォルトでauto_scaleが前がFalseだったときにBorderImageが動作している場合に動作します。
‘both’ : BorderImageのサイズに応じてxとyの両方のサイズを拡大/縮小します。これによりBorderImageが無効になって通常のImageと同じようにレンダリングされます。
‘x_only’ : Yの大きさはデフォルトとして機能してXはBorderImageの幅のサイズに比例します。
‘y_only’ : Xの大きさはデフォルトとして機能してYはBorderImageの幅のサイズに比例します。
‘y_full_x_lower’: Yは ‘y_only’のようにスケーリングされ、スケーリングされたバージョンのサイズが指定されたボーダーのみよりも小さい場合はYがスケーリングされます。
‘x_full_y_lower’:Xは ‘X_only’のようにスケーリングされ、スケーリングされたバージョンのサイズが指定されたボーダーのみよりも小さい場合はXがスケーリングされます。
‘both_lower’: これはauto_scaleが1.9.1でTrueのときに行ったことで、BorderImageがソースよりも小さい場合はXとYの両方の寸法がスケーリングされます。
BorderImageのサイズが水平または垂直のボーダーの合計よりも小さくてこのプロパティがTrueに設定されている場合は、ボーダーはサイズの小さいものに対応するように再スケーリングされます。
-
auto_scale¶ BorderImageが小さすぎるとコーナーが自動的に拡大/縮小されるかどうかを設定するプロパティです。
-
border¶ ボーダーのクラスを取得/設定するためのプロパティ。
-
display_border¶ ボーダーの表示サイズを取得/設定するためのプロパティ。
-
class
kivy.graphics.Callback¶ ベースクラス:
kivy.graphics.instructions.Instructionバージョン 1.0.4 で追加.
コールバックは描画操作が実行されるときに呼び出される命令です。 キャンバスに命令を追加するときに実行できます:
with self.canvas:
    Color(1, 1, 1)
    Rectangle(pos=self.pos, size=self.size)
    Callback(self.my_callback)
コールの定義:
def my_callback(self, instr):
    print('I have been called!')
警告
注意としては、多くのコールバックをコールすると、レンダリングパフォーマンスが大幅に低下する可能性があります。
キャンバスの更新は何か新しいことが起こるまで行われません。 コールバックから更新を求めることできます:
with self.canvas:
    self.cb = Callback(self.my_callback)
# then later in the code
self.cb.ask_update()
Callbackクラスを使用して別のツールキットのレンダリングメソッドを呼び出すと、OpenGLコンテキストに関する問題が発生します。 OpenGLの状態は他のツールキットによって操作されている可能性があります。プログラムの流れがKivyにリターンされるとすぐに破棄されます。 グリッチ、クラッシュ、ブラックホールなどが発生する可能性があります。これを回避するには、
reset_contextオプションをアクティブにすることができます。 コールバックへの呼び出しの後にKivyのレンダリングが正しくなるよう、OpenGLコンテキストの状態をリセットします。警告
reset_contextは完全なOpenGLリセットではありません。 問題が発生した場合はお問い合わせください。-
ask_update()¶ 親キャンバスに次のフレームで更新したいことを通知します。 たとえば値が変更されたために再描画をトリガする必要がある場合などに便利です。
バージョン 1.0.4 で追加.
-
reset_context¶ コールバックがコールされた後にKivyのOpenGLコンテキストをリセットする場合はTrueに設定します。
-
-
class
kivy.graphics.Canvas¶ ベースクラス:
kivy.graphics.instructions.CanvasBase重要なCanvasクラスです。 このクラスを使用して描画に使用するグラフィックスまたはコンテキスト命令を追加します。
注釈
CanvasはPythonの
with命令と入力と終了のセマンティクスをサポートしています。canvasの``with`` 命令を使用しない使い方:
self.canvas.add(Color(1., 1., 0))
self.canvas.add(Rectangle(size=(50, 50)))
canvasのPythonの
with命令の使い方:with self.canvas: Color(1., 1., 0) Rectangle(size=(50, 50))
-
after¶ ‘after’グループを取得するためのプロパティです。
-
ask_update()¶ Canvas に次のフレームで更新したいことを通知します。 たとえば値が変更されたために再描画をトリガする必要がある場合などに便利です。
-
before¶ ‘before’グループを取得するためのプロパティです。
-
clear()¶ Canvas内の全ての
Instructionをクリアーしてきれいにします。
-
draw()¶ instructionをウインドウに適用します。
-
opacity¶ キャンバスの不透明度の値を取得または設定するためのプロパティです。
バージョン 1.4.1 で追加.
不透明度はCanvasとその子の不透明度を制御します。 これは累積的であることに注意してください。値は現在のグローバルな不透明度に乗算されて、結果は現在のコンテキストカラーに適用されます。
たとえば親の不透明度が0.5で子の不透明度が0.2の場合は子の実際の不透明度は0.5 * 0.2 = 0.1になります。
次に不透明度がシェーダに次のように適用されます:
frag_color = color * vec4(1.0, 1.0, 1.0, opacity);
-
-
class
kivy.graphics.CanvasBase¶ ベースクラス:
kivy.graphics.instructions.InstructionGroupCanvasBaseはCanvasのコンテキストマネージャメソッドを提供します。
-
class
kivy.graphics.Color¶ ベースクラス:
kivy.graphics.instructions.ContextInstruction後に描画される頂点の色の状態を設定する命令。
これは0と1の間の色を表しますが、続くキャンバス内の任意の頂点命令のテクスチャに 乗数 として適用されます。 テクスチャが設定されていない場合は頂点命令はColor命令の正確な色を取ります。
例えば、Rectangleが均一な色``(0.5, 0.5, 0.5, 1.0)`` のテクスチャを持ち、先行Colorがrgba =``rgba=(1, 0.5, 2, 1)`` の場合、実際の表示色は``(0.5, 0.25, 1.0, 1.0)`` です。なぜならColor命令はすべてのrgbaコンポーネントに乗数として適用されるからです。 この場合は0〜1の範囲外の色成分は青色成分が目に2倍の強さになると結果を与えます。
PythonでColorを宣言するには次のようにします:
from kivy.graphics import Color

# create red v
c = Color(1, 0, 0)
# create blue color
c = Color(0, 1, 0)
# create blue color with 50% alpha
c = Color(0, 1, 0, .5)

# using hsv mode
c = Color(0, 1, 1, mode='hsv')
# using hsv mode + alpha
c = Color(0, 1, 1, .2, mode='hsv')
キーワード引数として渡すことでプロパティとして利用できるカラーコンポーネントを設定もできます;;
c = Color(b=0.5) # sets the blue component only
kv langでは色のプロパティを直接設定できます:
<Rule>:
    canvas:
        # red color
        Color:
            rgb: 1, 0, 0
        # blue color
        Color:
            rgb: 0, 1, 0
        # blue color with 50% alpha
        Color:
            rgba: 0, 1, 0, .5

        # using hsv mode
        Color:
            hsv: 0, 1, 1
        # using hsv mode + alpha
        Color:
            hsv: 0, 1, 1
            a: .5
-
a¶ アルファコンポーネントは0~1です。
-
b¶ 青コンポーネントは0~1です。
-
g¶ グリーンコンポーネントは0~1です。
-
h¶ 色相コンポーネントは0~1です。
-
hsv¶ HSVカラーは範囲が0~1の値が3つのリストと、1つのアルファを持ちます。
-
r¶ 赤コンポーネントは0~1です
-
rgb¶ 。
-
rgba¶ RGAカラーは範囲が0~1の値が4つのリストです。
-
s¶ 彩度コンポーネントは0~1です。
-
v¶ 値コンポーネントは0~1です。
-
-
class
kivy.graphics.ContextInstruction¶ ベースクラス:
kivy.graphics.instructions.InstructionContextInstructionクラスは直接のビジュアル表現を持たない命令の作成の基礎ですが、代わりに現在のCanvasの状態を変更します。 テクスチャの場バインディング、カラーパラメータの設定や行列操作などが含まれます。
-
class
kivy.graphics.Ellipse¶ ベースクラス:
kivy.graphics.vertex_instructions.Rectangle2次元の楕円。
バージョン 1.0.7 で変更: angle_startとangle_endを追加しました。
Parameters: - segments: int, デフォルト値は180
楕円を描くために必要なセグメントの数を定義します。 多くのセグメントがある場合は図はスムーズになります。
- angle_start: int, デフォルトは 0です
円の部分の開始角度を度で指定します。
- angle_end: int, デフォルトは 360です
円の部分の終了角度を度で指定します。
-
angle_end¶ 楕円の終了角度(単位:度)。デフォルトは360です。
-
angle_start¶ 楕円の開始角度(単位:度)。デフォルトは0です。
-
segments¶ 楕円のセグメント(分割)数を設定/取得するためのプロパティです。
-
class
kivy.graphics.Fbo¶ ベースクラス:
kivy.graphics.instructions.RenderContextOpenGL Framebuffer拡張をラッパーするFboクラス。 Fboは “with” ステートメントをサポートしています。
Parameters: - clear_color: タプル型、デフォルトは (0, 0, 0, 0)
フレームバッファをクリアするためのデフォルトの色を定義。
- size: タプル型、デフォルトは (1024, 1024)
フレームバッファーのデフォルトサイズ
- push_viewport: bool型、デフォルトはTrue
undefined
- with_depthbuffer :bool型、デフォルトはFalseです。
Trueの場合はフレームバッファにはZバッファが割り当てられます。
- with_stencilbuffer: bool型、デフォルトはFalseです。
バージョン 1.9.0 で追加.
Trueの場合はframebufferにはステンシルバッファが割り当てられます。
- texture:
Texture、デフォルトはNone Noneの場合はデフォルトのテクスチャが作成されます。
注釈
with_stencilbufferとwith_depthbufferの両方の使用はkivy 1.9.0ではサポートされていません-
add_reload_observer()¶ グラフィックスコンテキストがリロードされた後に呼び出されるコールバックを追加します。 カスタムデータをGPUに再アップロードできる場所です。
バージョン 1.2.0 で追加.
Parameters: - callback: func(context) -> return None
最初のパラメータはコンテキスト自身です
-
bind()¶ FBOを現在のOpenGLコンテキストにバインドします。 バインドとは、Framebufferを有効にて
release()が呼び出されるまで、すべての描画操作がFramebuffer内で動作することを意味します。バインド/リリース no 操作は、グラフィックスオブジェクトをグラフィックスオブジェクトに追加すると自動的に呼び出されます。 Framebufferを自分で操作したい場合は、次のように使用できます:
self.fbo = FBO()
self.fbo.bind()
# do any drawing command
self.fbo.release()

# then, your fbo texture is available at
print(self.fbo.texture)
-
clear_buffer()¶ clear_colorframebufferをクリアします.このメソッドを呼び出す前に、フレームバッファをバインドする必要があります:
fbo.bind()
fbo.clear_buffer()
fbo.release()
-
clear_color¶ カラーをクリアする、形式は(赤、緑、青、アルファ)。
-
get_pixel_color()¶ 指定されたウィンドウ座標wx、wyを持つピクセルの色を取得します。 RGBA形式で結果を返します。
バージョン 1.8.0 で追加.
-
pixels¶ ピクセルテクスチャをRGBA形式でのみ取得して符号なしバイトで取得します。 画像の原点は左下です。
バージョン 1.7.0 で追加.
-
release()¶ フレームバッファを解放する(バインドを解除)。
-
remove_reload_observer()¶ 以前
add_reload_observer()によって追加されたオブザーバーリストからコールバックを削除します。バージョン 1.2.0 で追加.
-
size¶ フレームバッファのサイズ(幅,高さ)形式。
サイズを変更するとフレームバッファの内容が失われます。
-
texture¶ framebufferテクスチャを返します
-
exception
kivy.graphics.GraphicException¶ ベースクラス:
Exceptionグラフィックスエラーが発生したときに発生する例外。
-
class
kivy.graphics.Instruction¶ ベースクラス:
kivy.event.ObjectWithUid使用可能な最小の命令を表します。 このクラスは内部使用のみで直接使用しないでください。
-
proxy_ref¶ 命令へのプロキシ参照を返します。つまり、ウィジェットの参照を作成しません。 詳細については weakref.proxy を参照してください。
バージョン 1.7.2 で追加.
-
-
class
kivy.graphics.InstructionGroup¶ ベースクラス:
kivy.graphics.instructions.InstructionInstructionグループ。 グラフィックス命令の追加と削除を可能にします。 次のように直接使用します:blue = InstructionGroup() blue.add(Color(0, 0, 1, 0.2)) blue.add(Rectangle(pos=self.pos, size=(100, 100))) green = InstructionGroup() green.add(Color(0, 1, 0, 0.4)) green.add(Rectangle(pos=(100, 100), size=(100, 100))) # Here, self should be a Widget or subclass [self.canvas.add(group) for group in [blue, green]]
-
add()¶ リストに新しい
Instructionを追加してください。
-
clear()¶ 全ての
Instructionを削除します。
-
get_group()¶ 特定のグループネームをもつすべての
Instructionを繰り返し可能な値を返します。
-
insert()¶ 新しい
Instructionをインデックスのリストに挿入します。
-
remove()¶ リストから既存の
Instructionを削除してください。
-
remove_group()¶ 特定のグループネームをもつ全ての
Instructionを削除します。
-
-
class
kivy.graphics.Line¶ ベースクラス:
kivy.graphics.instructions.VertexInstruction2Dの線。
線の描画は簡単にできます:
with self.canvas:
    Line(points=[100, 100, 200, 100, 100, 200], width=10)
ラインには3つの内部描画モードがあり、最適な結果を得るために注意する必要があります:
widthが1.0の場合、OpenGLからの標準のGL_LINE図面が使用されます。dash_lengthとdash_offsetは機能しますが、キャップとジョイントのプロパティはここで意味を持ちません。widthが1.0より大きい場合、三角測量方式に基づいたカスタム描画メソッドが使用されます。dash_lengthとdash_offsetはこのモードでは機能しません。 それに加えて現在の色のアルファ値が1.0未満の場合は、ステンシルを内部的に使用して線を描画します。
Parameters: - points: list
フォーマットは座標のリスト(x1、y1、x2、y2 ...)
- dash_length: int
セグメントの長さ(破線の場合)は、デフォルト値は1です。
- dash_offset: int
セグメントの終わりから次のセグメントの始まりまでのオフセットは、デフォルトで0になります。これを変更すると破線になります。
- width: float
線の幅です。デフォルトは1.0です。
- cap: str、デフォルトは ‘round’
より詳しくは
capを見てください。- joint: str, デフォルトは ‘round’
より詳しくは
jointを見てください。- cap_precision: int, デフォルトは10です
より詳しくは
cap_precisionを見てください- joint_precision: int, デフォルトは10です
より詳しくは
joint_precisionを見てください。より詳しくはcap_precisionを見てください。- joint_precision: int, デフォルトは10です
より詳しくは
joint_precisionを見てください。- close: bool, デフォルトは False
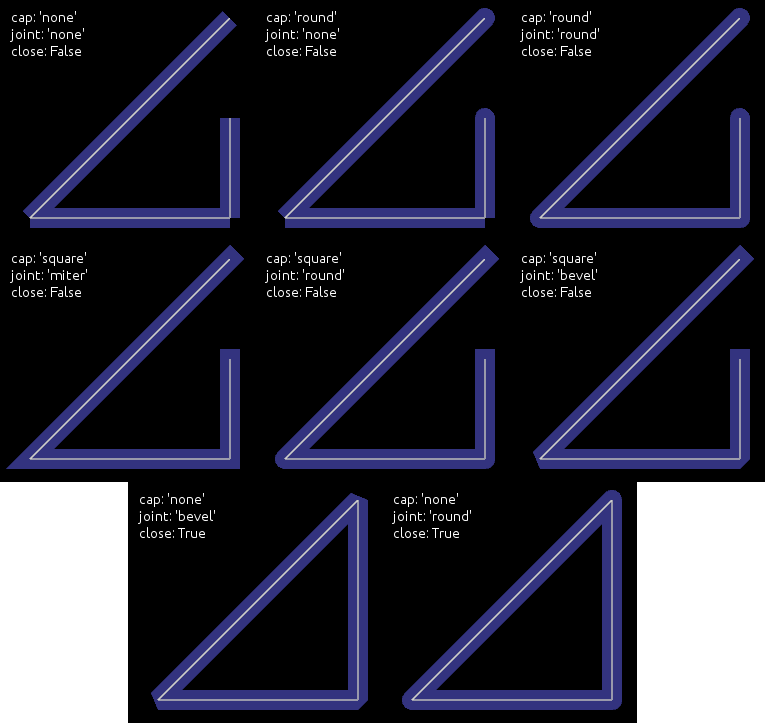
Trueの場合、線は閉じられます。
- circle: list
- ellipse: list
- rectangle: list
設定されている場合、
pointsは矩形を構築するように設定されます。 詳細はrectangleを参照してください。- bezier: list
設定されている場合、
pointsはベジェ曲線を構築するように設定されます。 詳細はbezierを参照してください。- bezier_precision: int, デフォルトは180
ベジェ曲線の精度。
バージョン 1.0.8 で変更: dash_offset` と dash_length が追加されました。
バージョン 1.4.1 で変更: width, cap, joint, cap_precision, joint_precision, close, ellipse, rectangle が追加されました。
バージョン 1.4.1 で変更: bezier`, bezier_precision が追加されました。
-
bezier¶ このプロパティを使用して
pointsを計算せずにベジェ線を作成します。 このプロパティは設定できません。取得できません。undefined
使用例:
Line(bezier=(x1, y1, x2, y2, x3, y3)
バージョン 1.4.2 で追加.
注釈
ベジエ曲線の計算は少ない点では安価ですが、複雑さは2次的なものなので多くの点を持つ線は非常に高価で慎重に使用してくださ!!
-
bezier_precision¶ 2つのセグメント間でベジェを描画するためのイテーレーション回数です。デフォルトは180です。bezier_precisionは1以上でなければなりません。
バージョン 1.4.2 で追加.
-
cap¶ 線の上限を決定します。デフォルトは ‘round’ です。 ‘none’ , ‘square’ または ‘round’ のいずれかになります。
バージョン 1.4.1 で追加.
-
cap_precision¶ undefined
バージョン 1.4.1 で追加.
-
circle¶ attr:points を計算せずに円を作成するにはこのプロパティを使用します。 このプロパティは設定できません。取得できません。
引数は(center_x, center_y, radius, angle_start, angle_end, segments)のタプルでなければならないです:
center_x と center_y は円の中心を表します
radiusは円の半径を表します
(オプション)angle_startとangle_endは角度です。 デフォルト値は0と360です。
(オプション)segmentsは楕円の精度です。 デフォルト値は角度の範囲から計算されます。
注意点は円を
closeするかどうかはあなた次第です。例えばシンプルな楕円を作成する場合、Pythonでは:
# simple circle
Line(circle=(150, 150, 50))

# only from 90 to 180 degrees
Line(circle=(150, 150, 50, 90, 180))

# only from 90 to 180 degrees, with few segments
Line(circle=(150, 150, 50, 90, 180, 20))
バージョン 1.4.1 で追加.
-
close¶ Trueの場合、線は閉じられます。
バージョン 1.4.1 で追加.
-
dash_length¶ カーブ内の破線の長さを取得/設定するためのプロパティ
バージョン 1.0.8 で追加.
-
dash_offset¶ カーブ内の破線の間のオフセットを取得/設定するためのプロパティ
バージョン 1.0.8 で追加.
-
ellipse¶ pointsを計算せずに楕円を作成するのにこのプロパティを使用します。 このプロパティは設定できません。取得できません。引数は (x, y, width, height, angle_start, angle_end, segments)のタプルでなければなりません。
xとy楕円の左下を表します
widthとheightは楕円のサイズを表します
(オプション)angle_startとangle_endは角度です。 デフォルト値は0と360です。
(オプション)segmentsは楕円の精度です。 デフォルト値は角度の範囲から計算されます。
注意点としては楕円を
closeするかどうかはあなた次第です。例えばシンプルな楕円を作成する場合、Pythonでは:
# simple ellipse
Line(ellipse=(0, 0, 150, 150))

# only from 90 to 180 degrees
Line(ellipse=(0, 0, 150, 150, 90, 180))

# only from 90 to 180 degrees, with few segments
Line(ellipse=(0, 0, 150, 150, 90, 180, 20))
バージョン 1.4.1 で追加.
-
joint¶ 行の結合を決定します。デフォルトは ‘round’ です。 ‘none’, ‘round’, ‘bevel’, ‘miter’のいずれかになります
バージョン 1.4.1 で追加.
-
joint_precision¶ “round”ジョイントを描画するためのイテレーションの数は、デフォルトでは10です。joint_precisionは少なくとも1でなければなりません
バージョン 1.4.1 で追加.
-
points¶ 線のポイントを取得/設定するためのプロパティ
警告
これにより常に新しいポイントリストからグラフィックス全体が再構成されます。 非常にCPUの計算が高くなる可能性があります。
-
rectangle¶ pointsを計算せずに矩形を構築するには、このプロパティを使用します。 このプロパティは設定できません。取得できません。引数は(x, y, width, height)のタプルでなければなりません:
xとyは矩形の左下の座標を表す
width と height はサイズを表します
線は自動的に閉じられます。
使用例:
Line(rectangle=(0, 0, 200, 200))
バージョン 1.4.1 で追加.
-
rounded_rectangle¶ pointsを計算せずに矩形を構築するには、このプロパティを使用します。 このプロパティは設定できません。取得できません。引数は次のいずれかのタプルの形式が必要です:
- (x, y, width, height, corner_radius)
- (x, y, width, height, corner_radius, resolution)
- (x, y, width, height, corner_radius1, corner_radius2, corner_radius3, corner_radius4)
- (x, y, width, height, corner_radius1, corner_radius2, corner_radius3, corner_radius4, resolution)
xとyは矩形の左下の座標を表す
width と height はサイズを表します
corner_radiusは、2つの境界線の間のピクセル数で、結合する円弧の中心です
resolutionは、各コーナーで円弧を描画するために使用される線分の数です(デフォルトは30)
線は自動的に閉じられます。
使用例:
Line(rounded_rectangle=(0, 0, 200, 200, 10, 20, 30, 40, 100))
バージョン 1.9.0 で追加.
-
width¶ 線の幅を設定、1デフォルト値は1.0。
バージョン 1.4.1 で追加.
-
class
kivy.graphics.SmoothLine¶ ベースクラス:
kivy.graphics.vertex_instructions.Lineover-draw法を使用した実験的な線はよりよいアンチエイリアシングの結果を取得します。それはいくつかの欠点があります:
線自体を横切る場合、アルファで線を引くことはおそらく意図した結果になりません。
それはあらかじめpremultiplied alpha(乗算ずみアルファ)を持つカスタムテクスチャを使用しています。
幅1ピクセルの下の行がサポートされていません:同じように見えます。
警告
これは未完の作業、実験的、そしてクラッシュの対象になります。
バージョン 1.9.0 で追加.
-
overdraw_width¶ 線のオーバードローの幅の設定、デフォルトは1.2。
-
class
kivy.graphics.MatrixInstruction¶ ベースクラス:
kivy.graphics.instructions.ContextInstructionキャンバス上のMatrix 処理命令のベースクラスです。
-
matrix¶ Matrixプロパティ。変換モジュールからの行列です。更新についてコンテキストを通知して変更が行われた際にこのプロパティを使用して行列を設定することが重要です。
-
stack¶ 行列スタックの名前を使用します。 ‘modelview_mat’ または ‘projection_mat’ にできます。
バージョン 1.6.0 で追加.
-
-
class
kivy.graphics.Mesh¶ ベースクラス:
kivy.graphics.instructions.VertexInstruction2Dメッシュ。
OpenGL ES2.0で私たちのグラフィックスの実装では、65535以上のインデックスを持てません。
verticesのリストは以下のように記述されています:
vertices = [x1, y1, u1, v1, x2, y2, u2, v2, ...]
            |            |  |            |
            +---- i1 ----+  +---- i2 ----+
三角形を描きたい場合は3つの頂点を追加します。次のようにしてインデックスリストを作成できます。
indices = [0, 1, 2]バージョン 1.1.0 で追加.
Parameters: - vertices:
vetricesのリストのフォーマット(x1, y1, u1, v1, x2, y2, u2, v2...)。
- indices: iterable
インデックスのリストのフォーマット (i1, i2, i3...)。
- mode: str
vboのモード。より詳しくは
modeをチェックしてください。デフォルトは ‘points’ です。- fmt: list
verticeの形式は、デフォルトでは各頂点は2D座標(x,y)と2Dテクスチャ座標(U,V)によって記述されています。リストの各要素はtupleまたはリストの形式であるべきです。
(変数名, サイズ, タイプ)
glsl命令にvertexデータをマッピングできます。
[(b’v_pos’, 2, b’float’), (b’v_tc’, 2, b’float’),]
使用できるようになります
attribute vec2 v_pos; attribute vec2 v_tc;
glslのvertexシェーダー。
バージョン 1.8.1 で変更: 以前は、 vertices と ` インデックス` は常にリストに変換されていましたが今はバッファインタフェースを実装していない場合にのみリストに変換されます。 なので例えば、 数の多い配列、Python配列などは、追加のコピーを作成することなくその場で使用されます。 しかしバッファは読み込み専用ではありません(cythonの制限のために変更されていなくても)、メモリ内で連続していなければなりません。
注釈
メモリ・ビューやバッファ・インタフェースを実装するインスタンスを渡すとき、 vertices`は浮動小数点のバッファ(Python配列の‘f’コード)でなければならず、 `インデックス`はunsigned short(Python配列の ‘H’ コード)。 他の形式の配列は内部的に変換されなければならず潜在的なポテンシャルは無効になります。
-
indices¶ vertexインデックスはメッシュを描画する際の順序を指定するために使用されます。
-
mode¶ vertices/インデックスの描画に使用されるVBOモード。 ‘points’, ‘line_strip’, ‘line_loop’, ‘lines’, ‘triangles’, ‘triangle_strip’、’triangle_fan’ のいずれかになります。
-
vertices¶ メッシュの構築に使用されたx, y, u, v 座標のリスト。メッシュ命令では頂点のフォーマットを今すぐ変更できません。つまり、x、y + 1つのテクスチャ座標だけです。
-
class
kivy.graphics.Point¶ ベースクラス:
kivy.graphics.instructions.VertexInstructionA list of 2d points. Each point is represented as a square with a width/height of 2 times the
pointsize.Parameters: - points: list
List of points in the format (x1, y1, x2, y2...), where each pair of coordinates specifies the center of a new point.
- pointsize: float, defaults to 1.
The size of the point, measured from the center to the edge. A value of 1.0 therefore means the real size will be 2.0 x 2.0.
警告
Starting from version 1.0.7, vertex instruction have a limit of 65535 vertices (indices of vertex to be accurate). 2 entries in the list (x, y) will be converted to 4 vertices. So the limit inside Point() class is 2^15-2.
-
add_point()¶ Add a point to the current
pointslist.If you intend to add multiple points, prefer to use this method instead of reassigning a new
pointslist. Assigning a newpointslist will recalculate and reupload the whole buffer into the GPU. If you use add_point, it will only upload the changes.
-
points¶ Property for getting/settings the center points in the points list. Each pair of coordinates specifies the center of a new point.
-
pointsize¶ Property for getting/setting point size. The size is measured from the center to the edge, so a value of 1.0 means the real size will be 2.0 x 2.0.
-
class
kivy.graphics.PopMatrix¶ ベースクラス:
kivy.graphics.instructions.ContextInstructionPop the matrix from the context’s matrix stack onto the model view.
-
stack¶ 行列スタックの名前を使用します。 ‘modelview_mat’ または ‘projection_mat’ にできます。
バージョン 1.6.0 で追加.
-
-
class
kivy.graphics.PushMatrix¶ ベースクラス:
kivy.graphics.instructions.ContextInstructionPush the matrix onto the context’s matrix stack.
-
stack¶ 行列スタックの名前を使用します。 ‘modelview_mat’ または ‘projection_mat’ にできます。
バージョン 1.6.0 で追加.
-
-
class
kivy.graphics.Quad¶ ベースクラス:
kivy.graphics.instructions.VertexInstructionA 2d quad.
Parameters: - points: list
List of point in the format (x1, y1, x2, y2, x3, y3, x4, y4).
-
points¶ Property for getting/settings points of the quad.
-
class
kivy.graphics.Rectangle¶ ベースクラス:
kivy.graphics.instructions.VertexInstructionA 2d rectangle.
Parameters: - pos: list
Position of the rectangle, in the format (x, y).
- size: list
Size of the rectangle, in the format (width, height).
-
pos¶ Property for getting/settings the position of the rectangle.
-
size¶ Property for getting/settings the size of the rectangle.
-
class
kivy.graphics.RenderContext¶ ベースクラス:
kivy.graphics.instructions.CanvasThe render context stores all the necessary information for drawing, i.e.:
- The vertex shader
- The fragment shader
- The default texture
- The state stack (color, texture, matrix...)
-
shader¶ Return the shader attached to the render context.
-
use_parent_modelview¶ If True, the parent modelview matrix will be used.
バージョン 1.7.0 で追加.
Before:
rc['modelview_mat'] = Window.render_context['modelview_mat']
Now:
rc = RenderContext(use_parent_modelview=True)
-
use_parent_projection¶ If True, the parent projection matrix will be used.
バージョン 1.7.0 で追加.
Before:
rc['projection_mat'] = Window.render_context['projection_mat']
Now:
rc = RenderContext(use_parent_projection=True)
-
class
kivy.graphics.Rotate¶ ベースクラス:
kivy.graphics.context_instructions.TransformRotate the coordinate space by applying a rotation transformation on the modelview matrix. You can set the properties of the instructions afterwards with e.g.
rot.angle = 90
rot.axis = (0, 0, 1)
-
angle¶ Property for getting/setting the angle of the rotation.
-
axis¶ Property for getting/setting the axis of the rotation.
The format of the axis is (x, y, z).
-
origin¶ Origin of the rotation.
バージョン 1.7.0 で追加.
The format of the origin can be either (x, y) or (x, y, z).
-
-
class
kivy.graphics.Scale¶ ベースクラス:
kivy.graphics.context_instructions.TransformInstruction to create a non uniform scale transformation.
Create using one or three arguments:
Scale(s)         # scale all three axes the same
Scale(x, y, z)   # scale the axes independently
バージョン 1.6.0 で撤廃: Deprecated single scale property in favor of x, y, z, xyz axis independent scaled factors.
-
origin¶ Origin of the scale.
バージョン 1.9.0 で追加.
The format of the origin can be either (x, y) or (x, y, z).
-
scale¶ Property for getting/setting the scale.
バージョン 1.6.0 で撤廃: Deprecated in favor of per axis scale properties x,y,z, xyz, etc.
-
x¶ Property for getting/setting the scale on the X axis.
バージョン 1.6.0 で変更.
-
xyz¶ 3 tuple scale vector in 3D in x, y, and z axis.
バージョン 1.6.0 で変更.
-
y¶ Property for getting/setting the scale on the Y axis.
バージョン 1.6.0 で変更.
-
z¶ Property for getting/setting the scale on Z axis.
バージョン 1.6.0 で変更.
-
-
class
kivy.graphics.StencilPop¶ ベースクラス:
kivy.graphics.instructions.InstructionPop the stencil stack. See the module documentation for more information.
-
class
kivy.graphics.StencilPush¶ ベースクラス:
kivy.graphics.instructions.InstructionPush the stencil stack. See the module documentation for more information.
-
class
kivy.graphics.StencilUse¶ ベースクラス:
kivy.graphics.instructions.InstructionUse current stencil buffer as a mask. Check the module documentation for more information.
-
func_op¶ Determine the stencil operation to use for glStencilFunc(). Can be one of ‘never’, ‘less’, ‘equal’, ‘lequal’, ‘greater’, ‘notequal’, ‘gequal’ or ‘always’.
By default, the operator is set to ‘equal’.
バージョン 1.5.0 で追加.
-
-
class
kivy.graphics.StencilUnUse¶ ベースクラス:
kivy.graphics.instructions.InstructionUse current stencil buffer to unset the mask.
-
class
kivy.graphics.Translate¶ ベースクラス:
kivy.graphics.context_instructions.TransformInstruction to create a translation of the model view coordinate space.
Construct by either:
Translate(x, y)         # translate in just the two axes
Translate(x, y, z)      # translate in all three axes
-
x¶ Property for getting/setting the translation on the X axis.
-
xy¶ 2 tuple with translation vector in 2D for x and y axis.
-
xyz¶ 3 tuple translation vector in 3D in x, y, and z axis.
-
y¶ Property for getting/setting the translation on the Y axis.
-
z¶ Property for getting/setting the translation on the Z axis.
-
-
class
kivy.graphics.Triangle¶ ベースクラス:
kivy.graphics.instructions.VertexInstructionA 2d triangle.
Parameters: - points: list
List of points in the format (x1, y1, x2, y2, x3, y3).
-
points¶ Property for getting/settings points of the triangle.
-
class
kivy.graphics.VertexInstruction¶ ベースクラス:
kivy.graphics.instructions.InstructionThe VertexInstruction class is the base for all graphics instructions that have a direct visual representation on the canvas, such as Rectangles, Triangles, Lines, Ellipse and so on.
-
source¶ This property represents the filename to load the texture from. If you want to use an image as source, do it like this:
with self.canvas:
    Rectangle(source='mylogo.png', pos=self.pos, size=self.size)
Here’s the equivalent in Kivy language:
<MyWidget>:
    canvas:
        Rectangle:
            source: 'mylogo.png'
            pos: self.pos
            size: self.size
注釈
The filename will be searched for using the
kivy.resources.resource_find()function.
-
tex_coords¶ This property represents the texture coordinates used for drawing the vertex instruction. The value must be a list of 8 values.
A texture coordinate has a position (u, v), and a size (w, h). The size can be negative, and would represent the ‘flipped’ texture. By default, the tex_coords are:
[u, v, u + w, v, u + w, v + h, u, v + h]
You can pass your own texture coordinates if you want to achieve fancy effects.
警告
The default values just mentioned can be negative. Depending on the image and label providers, the coordinates are flipped vertically because of the order in which the image is internally stored. Instead of flipping the image data, we are just flipping the texture coordinates to be faster.
-
texture¶ Property that represents the texture used for drawing this Instruction. You can set a new texture like this:
from kivy.core.image import Image

texture = Image('logo.png').texture
with self.canvas:
    Rectangle(texture=texture, pos=self.pos, size=self.size)
Usually, you will use the
sourceattribute instead of the texture.
-
-
class
kivy.graphics.ClearColor¶ ベースクラス:
kivy.graphics.instructions.InstructionClearColor Graphics Instruction.
バージョン 1.3.0 で追加.
Sets the clear color used to clear buffers with the glClear function or
ClearBuffersgraphics instructions.-
a¶ アルファコンポーネントは0~1です。
-
b¶ 青コンポーネントは0~1です。
-
g¶ グリーンコンポーネントは0~1です。
-
r¶ 赤コンポーネントは0~1です
-
rgb¶ RGB color, a list of 3 values in 0-1 range where alpha will be 1.
-
rgba¶ RGBA color used for the clear color, a list of 4 values in the 0-1 range.
-
-
class
kivy.graphics.ClearBuffers¶ ベースクラス:
kivy.graphics.instructions.InstructionClearbuffer Graphics Instruction.
バージョン 1.3.0 で追加.
Clear the buffers specified by the instructions buffer mask property. By default, only the coloc buffer is cleared.
-
clear_color¶ If True, the color buffer will be cleared.
-
clear_depth¶ If True, the depth buffer will be cleared.
-
clear_stencil¶ If True, the stencil buffer will be cleared.
-
-
class
kivy.graphics.PushState¶ ベースクラス:
kivy.graphics.instructions.ContextInstructionInstruction that pushes arbitrary states/uniforms onto the context state stack.
バージョン 1.6.0 で追加.
-
class
kivy.graphics.ChangeState¶ ベースクラス:
kivy.graphics.instructions.ContextInstructionInstruction that changes the values of arbitrary states/uniforms on the current render context.
バージョン 1.6.0 で追加.
-
class
kivy.graphics.PopState¶ ベースクラス:
kivy.graphics.instructions.ContextInstructionInstruction that pops arbitrary states/uniforms off the context state stack.
バージョン 1.6.0 で追加.
-
class
kivy.graphics.ApplyContextMatrix¶ ベースクラス:
kivy.graphics.instructions.ContextInstructionPre-multiply the matrix at the top of the stack specified by target_stack by the matrix at the top of the ‘source_stack’
バージョン 1.6.0 で追加.
-
source_stack¶ Name of the matrix stack to use as a source. Can be ‘modelview_mat’ or ‘projection_mat’.
バージョン 1.6.0 で追加.
-
target_stack¶ Name of the matrix stack to use as a target. Can be ‘modelview_mat’ or ‘projection_mat’.
バージョン 1.6.0 で追加.
-
-
class
kivy.graphics.UpdateNormalMatrix¶ ベースクラス:
kivy.graphics.instructions.ContextInstructionUpdate the normal matrix ‘normal_mat’ based on the current modelview matrix. This will compute ‘normal_mat’ uniform as: inverse( transpose( mat3(mvm) ) )
バージョン 1.6.0 で追加.
-
class
kivy.graphics.LoadIdentity¶ ベースクラス:
kivy.graphics.instructions.ContextInstructionLoad the identity Matrix into the matrix stack specified by the instructions stack property (default=’modelview_mat’)
バージョン 1.6.0 で追加.
-
stack¶ 行列スタックの名前を使用します。 ‘modelview_mat’ または ‘projection_mat’ にできます。
-