Table Of Contents
Application (翻訳中)
App クラスは Kivy アプリを作る上で基本となるものです。Kivyのメインループを走らせるためのエントリーポイントとお考えください。ほとんどの場合、このクラスのサブクラスを作った上で、アプリを開発していくことになるでしょう。あなた独自の App クラスのインスタンスを作り、アプリを走らせる準備ができたら、そのインスタンスの App.run() メソッドを走らせるのです。
Creating an Application (アプリを作る)
build() メソッドをオーバーライドして作る方法
アプリを初期化するには、あなたのアプリクラスにおいて build() メソッドをオーバーライドし、ウィジェットツリー (のルートウィジェット) を return で返すようにしてください。
ボタンを表示するだけのきわめて単純なアプリの例です:
'''
Application example using build() + return
==========================================

An application can be built if you return a widget on build(), or if you set
self.root.
'''

import kivy
kivy.require('1.0.7')

from kivy.app import App
from kivy.uix.button import Button


class TestApp(App):

    def build(self):
        # return a Button() as a root widget
        return Button(text='hello world')


if __name__ == '__main__':
    TestApp().run()
このファイルは examples フォルダにもあります ( kivy/examples/application/app_with_build.py )。
この例では、根 (ルートウィジェット) のみから成るウィジェットツリーが構成されます。
kvファイルを用いて作る方法
kv言語 ( Kivy Language(翻訳済み) ) を使ってアプリを作ることもできます。 .kv ファイルは (ウィジェットのプロパティ等に関する) ルールやルートウィジェットの定義を含みます。上記同様、ボタンを表示するだけの単純なアプリを kv ファイルを用いて書いてみます。
‘test.kv’ の中身です:
#:kivy 1.0

Button:
    text: 'Hello from test.kv'
‘main.py’ の中身です:
'''
Application built from a  .kv file
==================================

This shows how to implicitly use a .kv file for your application. You
should see a full screen button labelled "Hello from test.kv".

After Kivy instantiates a subclass of App, it implicitly searches for a .kv
file. The file test.kv is selected because the name of the subclass of App is
TestApp, which implies that kivy should try to load "test.kv". That file
contains a root Widget.
'''

import kivy
kivy.require('1.0.7')

from kivy.app import App


class TestApp(App):
    pass


if __name__ == '__main__':
    TestApp().run()
kivy/examples/application/app_with_kv.py もご参照ください。
main.py と test.kv の関係は、 App.load_kv() に書いてあります。
Application configuration (アプリの設定)
設定ファイルの利用
あなたのアプリは独自の設定ファイルを必要とするかもしれません。 もし、 App.build_config() において、セクション・キー・値 の組を config パラメータ ( ConfigParser のインスタンスです) を用いて追加すれば、App クラスは自動的に .ini ファイルを操作します。
class TestApp(App):
    def build_config(self, config):
        config.setdefaults('section1', {
            'key1': 'value1',
            'key2': '42'
        })
config にセクションを追加すると、 ただちにiniファイルが作成されます。どこに作成されるかは get_application_config を見てください。またその名前はアプリクラスの名前に基づいて付けられます。 アプリクラスの名前が “TestApp” ならば、iniファイルの名前は “test.ini” となります。そしてその中身は以下のようになります。
[section1]
key1 = value1
key2 = 42
以後、”test.ini” は実行時に自動的に読み込まれるようになります。またファイル内の設定には、 App.build() メソッドの中でアクセスすることができます。
class TestApp(App):
    def build_config(self, config):
        config.setdefaults('section1', {
            'key1': 'value1',
            'key2': '42'
        })

    def build(self):
        config = self.config
        return Label(text='key1 is %s and key2 is %d' % (
            config.get('section1', 'key1'),
            config.getint('section1', 'key2')))
Create a settings panel (設定パネルを作る)
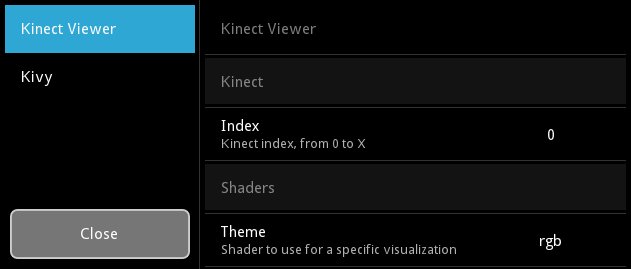
アプリに設定パネルを持たせ、ユーザが設定値を自由に変更できるようにすることもできます。ここでは KinectViewer の例 (examples ディレクトリにあります) を引用します:
App.build_settings() を拡張することで、独自のパネルを追加することもできます。パネルを作るには Settings を見てください。最初に、データが記述された JSON (JavaScript Object Notation) ファイルが必要になるでしょう。
例として、独自の config を持った TestApp のスニペットを再び取り上げましょう。次のような JSON を用いることができます。
[
    { "type": "title",
      "title": "Test application" },

    { "type": "options",
      "title": "My first key",
      "desc": "Description of my first key",
      "section": "section1",
      "key": "key1",
      "options": ["value1", "value2", "another value"] },

    { "type": "numeric",
      "title": "My second key",
      "desc": "Description of my second key",
      "section": "section1",
      "key": "key2" }
]
この JSON に基づいたパネルを、以下のように作ることができます。自動的にすべてのオプションが作成され、それらは App.config ConfigParser インスタンスにリンクされます。
class TestApp(App):
    # ...
    def build_settings(self, settings):
        jsondata = """... put the json data here ..."""
        settings.add_json_panel('Test application',
            self.config, data=jsondata)
これだけです!設定パネルを出すには F1 キー(デフォルトのキーストロークです)を押すか、もしくはアンドロイド端末であれば、「設定キー」をタッチしてください。手動で行いたいのであれば、 App.open_settings() や App.close_settings() を呼び出すと良いでしょう。このパネルにおける設定値の変更は、自動的に設定ファイルに反映されます。
設定パネルのプロパティを変更するには、 App.build_settings() を使うとよいでしょう。たとえば、JSONパネルを切り替えるためのサイドバーの長さは、デフォルトでは 200dp です。これを狭くしたいのであれば、たとえば次の1行を:
settings.interface.menu.width = dp(100)
あなたの build_settings() メソッドに加えるとよいでしょう。
あなたはユーザが設定値を変更したタイミングを知りたいと思うかもしれません。たとえば設定値の変更に適応するための操作や、UIのリロードを行うために、です。このような場合は on_config_change() メソッドをオーバーロードするとよいでしょう:
class TestApp(App):
    # ...
    def on_config_change(self, config, section, key, value):
        if config is self.config:
            token = (section, key)
            if token == ('section1', 'key1'):
                print('Our key1 has been changed to', value)
            elif token == ('section1', 'key2'):
                print('Our key2 has been changed to', value)
デフォルトでは、(アプリの設定パネルではなく)KIvy全体に関する設定パネルは settings インスタンスの中に与えられます。このパネルが不要であれば、あなたのアプリクラスで次のように宣言してください:
class TestApp(App):
    use_kivy_settings = False
    # ...
これは Kivy 全体の設定パネルを取り除くだけにすぎません。settings インスタンスは依然として有効です。もし settings インスタンスも使えないようにしたいのであれば、たとえば次のようにするとよいでしょう:
class TestApp(App):
    def open_settings(self, *largs):
        pass
バージョン 1.0.7 で追加.
Profiling with on_start and on_stop (on_startとon_stopを用いたプロファイリング)
Pythonコードのどの部分を改善すべきかを発見するのに有用な方法の1つは、プロファイル機能を用いることです。標準ライブラリのプロファイラー (http://docs.python.org/2/library/profile.html) はソースコードをプロファイルするのに複数のオプションを提供してくれます。しかしながら、プログラム全体をプロファイリングする上で、profile をモジュールとして使う自然な方法や、profile の run メソッドを用いる方法は、Kivy では動きません。その代わり App.on_start() メソッドや App.on_stop() メソッドを用いることが可能です:
import cProfile

class MyApp(App):
    def on_start(self):
        self.profile = cProfile.Profile()
        self.profile.enable()

    def on_stop(self):
        self.profile.disable()
        self.profile.dump_stats('myapp.profile')
このコードにより、アプリを終了するときに myapp.profile という名前のファイルが作られるでしょう。
Customising layout(レイアウトのカスタマイズ)
App.settings_cls プロパティに適切な値(クラスなど)を渡すことで、設定画面のレイアウトを好みのものに変更することができます。デフォルトでは、このプロパティには Settings クラスが入っていますが、これはサイドバーがあるようなレイアウトになっています。しかし kivy.uix.settings にあるようなレイアウトクラスを選ぶこともできますし、独自のレイアウトクラスを作っても構いません。詳しくは kivy.uix.settings モジュールの情報を見てください。
設定パネルがどのように表示されるか、 App.display_settings() をオーバーライドすることでカスタマイズすることができます。このメソッドは設定パネルがスクリーンに表示される前に呼び出されるものです。
デフォルトではパネルをウィンドウの上部に描画しますが、
たとえばポップアップ( Popup )にしたり、もしスクリーンマネージャ( ScreenManager )を使っているのであれば、スクリーンの1つとして加えることもできます。もしそのようにするのであれば、 App.close_settings() を修正し、パネルを適切に抜けるようにする必要があります。設定パネルをポップアップ内で表示するには、たとえば次のようにすることで実現できます:
def display_settings(self, settings):
    try:
        p = self.settings_popup
    except AttributeError:
        self.settings_popup = Popup(content=settings,
                                    title='Settings',
                                    size_hint=(0.8, 0.8))
        p = self.settings_popup
    if p.content is not settings:
        p.content = settings
    p.open()

def close_settings(self, *args):
    try:
        p = self.settings_popup
        p.dismiss()
    except AttributeError:
        pass # Settings popup doesn't exist
最後に、もし現在の設定パネルを別なもので置き換えたいのであれば、 App.destroy_settings() を用いて、内部における現在のパネルへのリファレンスを消去することができます。もし App.display_settings() を修正していたのであれば、設定パネルが置き換えられたかどうかを検知することに注意を払わなければなりません。
Pause mode(ポーズモード)
バージョン 1.1.0 で追加.
タブレットやスマートフォンを使用するユーザは、任意の時点で別のアプリの使用に切り替えることができます。デフォルトでは、あなたのアプリはクローズし、 App.on_stop() イベントが呼び出されます。
もしポーズモードがサポートされているのであれば、ユーザが別のアプリに切り替えたとき、再びあなたのアプリに帰ってくるまで無期限に待つことになるでしょう。アンドロイド端末上の OpenGL ではこれが問題になります:もしあなたのアプリがレジュームしたとき、 OpenGL ES コンテキストが無事復旧する保証がないのです。すべての OpenGL データを復旧するためのメカニズムは、Kivyではまだ実装されていないのです。
現在実装されているメカニズムは次のようなものです:
他のアプリへの切替、端末のシャットダウンなど、何らかの理由でOSによってポーズモードがアクティベートされたとき、Kivyはすべてのフレームをチェックします。
App.on_pause()メソッドが呼び出されます。もし False が返された場合、
App.on_stop()メソッドが呼び出されます。一方、もし True が返された場合(こちらがデフォルトです)、OSによって再びレジュームされるまで、アプリはスリープします。
アプリがレジュームしたとき、meth:App.on_resume が呼び出されます。
もしアプリのメモリがOSによって再利用されたのであれば、何も呼び出されることはありません。
on_pause() メソッドをどのように使うべきかについて、簡単な例です:
class TestApp(App):

   def on_pause(self):
      # Here you can save data if needed
      return True

   def on_resume(self):
      # Here you can check if any data needs replacing (usually nothing)
      pass
警告
on_pause と on_stop の両方において重要なデータをセーブしなければなりません。なぜなら、on_pause が呼び出された後、on_resume は再び呼び出されないかもしれないからです。
-
class
kivy.app.App(**kwargs)[ソース]¶ ベースクラス:
kivy.event.EventDispatcherApplication class, see module documentation for more information.
Events: - on_start:
Fired when the application is being started (before the
runTouchApp()call.- on_stop:
Fired when the application stops.
- on_pause:
Fired when the application is paused by the OS.
- on_resume:
Fired when the application is resumed from pause by the OS. Beware: you have no guarantee that this event will be fired after the on_pause event has been called.
バージョン 1.7.0 で変更: Parameter kv_file added.
バージョン 1.8.0 で変更: Parameters kv_file and kv_directory are now properties of App.
-
build()[ソース]¶ Initializes the application; it will be called only once. If this method returns a widget (tree), it will be used as the root widget and added to the window.
戻り値: None or a root Widgetinstance if no self.root exists.
-
build_config(config)[ソース]¶ バージョン 1.0.7 で追加.
This method is called before the application is initialized to construct your
ConfigParserobject. This is where you can put any default section / key / value for your config. If anything is set, the configuration will be automatically saved in the file returned byget_application_config().Parameters: - config:
ConfigParser Use this to add default section / key / value items
- config:
-
build_settings(settings)[ソース]¶ バージョン 1.0.7 で追加.
This method is called when the user (or you) want to show the application settings. It is called once when the settings panel is first opened, after which the panel is cached. It may be called again if the cached settings panel is removed by
destroy_settings().You can use this method to add settings panels and to customise the settings widget e.g. by changing the sidebar width. See the module documentation for full details.
Parameters: - settings:
Settings Settings instance for adding panels
- settings:
-
close_settings(*largs)[ソース]¶ Close the previously opened settings panel.
戻り値: True if the settings has been closed.
-
config= None¶ Returns an instance of the
ConfigParserfor the application configuration. You can use this to query some config tokens in thebuild()method.
-
create_settings()[ソース]¶ Create the settings panel. This method will normally be called only one time per application life-time and the result is cached internally, but it may be called again if the cached panel is removed by
destroy_settings().By default, it will build a settings panel according to
settings_cls, callbuild_settings(), add a Kivy panel ifuse_kivy_settingsis True, and bind to on_close/on_config_change.If you want to plug your own way of doing settings, without the Kivy panel or close/config change events, this is the method you want to overload.
バージョン 1.8.0 で追加.
-
destroy_settings()[ソース]¶ バージョン 1.8.0 で追加.
Dereferences the current settings panel if one exists. This means that when
App.open_settings()is next run, a new panel will be created and displayed. It doesn’t affect any of the contents of the panel, but lets you (for instance) refresh the settings panel layout if you have changed the settings widget in response to a screen size change.If you have modified
open_settings()ordisplay_settings(), you should be careful to correctly detect if the previous settings widget has been destroyed.
-
directory¶ バージョン 1.0.7 で追加.
Return the directory where the application lives.
-
display_settings(settings)[ソース]¶ バージョン 1.8.0 で追加.
Display the settings panel. By default, the panel is drawn directly on top of the window. You can define other behaviour by overriding this method, such as adding it to a ScreenManager or Popup.
You should return True if the display is successful, otherwise False.
Parameters: - settings:
Settings You can modify this object in order to modify the settings display.
- settings:
-
get_application_config(defaultpath='%(appdir)s/%(appname)s.ini')[ソース]¶ バージョン 1.0.7 で追加.
バージョン 1.4.0 で変更: Customized the default path for iOS and Android platforms. Added a defaultpath parameter for desktop OS’s (not applicable to iOS and Android.)
Return the filename of your application configuration. Depending on the platform, the application file will be stored in different locations:
- on iOS: <appdir>/Documents/.<appname>.ini
- on Android: /sdcard/.<appname>.ini
- otherwise: <appdir>/<appname>.ini
When you are distributing your application on Desktops, please note that if the application is meant to be installed system-wide, the user might not have write-access to the application directory. If you want to store user settings, you should overload this method and change the default behavior to save the configuration file in the user directory.
class TestApp(App):
    def get_application_config(self):
        return super(TestApp, self).get_application_config(
            '~/.%(appname)s.ini')
Some notes:
-
icon¶ Icon of your application. The icon can be located in the same directory as your main file. You can set this as follows:
class MyApp(App):
    def build(self):
        self.icon = 'myicon.png'
バージョン 1.0.5 で追加.
バージョン 1.8.0 で変更: icon is now a
StringProperty. Don’t set the icon in the class as previously stated in the documentation.注釈
For Kivy prior to 1.8.0, you need to set this as follows:
   class MyApp(App):
       icon = 'customicon.png'

Recommended 256x256 or 1024x1024? for GNU/Linux and Mac OSX
32x32 for Windows7 or less. <= 256x256 for windows 8
256x256 does work (on Windows 8 at least), but is scaled
down and doesn't look as good as a 32x32 icon.
-
kv_directory¶ Path of the directory where application kv is stored, defaults to None
バージョン 1.8.0 で追加.
If a kv_directory is set, it will be used to get the initial kv file. By default, the file is assumed to be in the same directory as the current App definition file.
-
kv_file¶ Filename of the Kv file to load, defaults to None.
バージョン 1.8.0 で追加.
If a kv_file is set, it will be loaded when the application starts. The loading of the “default” kv file will be prevented.
-
load_config()[ソース]¶ (internal) This function is used for returning a ConfigParser with the application configuration. It’s doing 3 things:
- Creating an instance of a ConfigParser
- Loading the default configuration by calling
build_config(), then - If it exists, it loads the application configuration file, otherwise it creates one.
戻り値: ConfigParserinstance
-
load_kv(filename=None)[ソース]¶ This method is invoked the first time the app is being run if no widget tree has been constructed before for this app. This method then looks for a matching kv file in the same directory as the file that contains the application class.
For example, say you have a file named main.py that contains:
class ShowcaseApp(App):
    pass
This method will search for a file named showcase.kv in the directory that contains main.py. The name of the kv file has to be the lowercase name of the class, without the ‘App’ postfix at the end if it exists.
You can define rules and a root widget in your kv file:
<ClassName>: # this is a rule
    ...

ClassName: # this is a root widget
    ...
There must be only one root widget. See the Kivy Language(翻訳済み) documentation for more information on how to create kv files. If your kv file contains a root widget, it will be used as self.root, the root widget for the application.
-
name¶ バージョン 1.0.7 で追加.
Return the name of the application based on the class name.
-
on_config_change(config, section, key, value)[ソース]¶ Event handler fired when a configuration token has been changed by the settings page.
-
on_pause()[ソース]¶ Event handler called when Pause mode is requested. You should return True if your app can go into Pause mode, otherwise return False and your application will be stopped.
You cannot control when the application is going to go into this mode. It’s determined by the Operating System and mostly used for mobile devices (android/ios) and for resizing.
The default return value is True.
バージョン 1.1.0 で追加.
バージョン 1.10.0 で変更: The default return value is now True.
-
on_resume()[ソース]¶ Event handler called when your application is resuming from the Pause mode.
バージョン 1.1.0 で追加.
警告
When resuming, the OpenGL Context might have been damaged / freed. This is where you can reconstruct some of your OpenGL state e.g. FBO content.
-
on_start()[ソース]¶ Event handler for the on_start event which is fired after initialization (after build() has been called) but before the application has started running.
-
on_stop()[ソース]¶ Event handler for the on_stop event which is fired when the application has finished running (i.e. the window is about to be closed).
-
open_settings(*largs)[ソース]¶ Open the application settings panel. It will be created the very first time, or recreated if the previously cached panel has been removed by
destroy_settings(). The settings panel will be displayed with thedisplay_settings()method, which by default adds the settings panel to the Window attached to your application. You should override that method if you want to display the settings panel differently.戻り値: True if the settings has been opened.
-
options= None¶ Options passed to the __init__ of the App
-
root= None¶ The root widget returned by the
build()method or by theload_kv()method if the kv file contains a root widget.
-
settings_cls¶ バージョン 1.8.0 で追加.
The class used to construct the settings panel and the instance passed to
build_config(). You should use eitherSettingsor one of the provided subclasses with different layouts (SettingsWithSidebar,SettingsWithSpinner,SettingsWithTabbedPanel,SettingsWithNoMenu). You can also create your own Settings subclass. See the documentation ofSettingsfor more information.settings_clsis anObjectPropertyand defaults toSettingsWithSpinnerwhich displays settings panels with a spinner to switch between them. If you set a string, theFactorywill be used to resolve the class.
-
stop(*largs)[ソース]¶ Stop the application.
If you use this method, the whole application will stop by issuing a call to
stopTouchApp().
-
title¶ Title of your application. You can set this as follows:
class MyApp(App):
    def build(self):
        self.title = 'Hello world'
バージョン 1.0.5 で追加.
バージョン 1.8.0 で変更: title is now a
StringProperty. Don’t set the title in the class as previously stated in the documentation.注釈
For Kivy < 1.8.0, you can set this as follows:
class MyApp(App):
    title = 'Custom title'
If you want to dynamically change the title, you can do:
from kivy.base import EventLoop
EventLoop.window.title = 'New title'
-
use_kivy_settings= True¶ バージョン 1.0.7 で追加.
If True, the application settings will also include the Kivy settings. If you don’t want the user to change any kivy settings from your settings UI, change this to False.
-
user_data_dir¶ バージョン 1.7.0 で追加.
Returns the path to the directory in the users file system which the application can use to store additional data.
Different platforms have different conventions with regards to where the user can store data such as preferences, saved games and settings. This function implements these conventions. The <app_name> directory is created when the property is called, unless it already exists.
On iOS, ~/Documents/<app_name> is returned (which is inside the app’s sandbox).
On Android, /sdcard/<app_name> is returned.
On Windows, %APPDATA%/<app_name> is returned.
On OS X, ~/Library/Application Support/<app_name> is returned.
On Linux, $XDG_CONFIG_HOME/<app_name> is returned.